チュウニズム全国対戦イベント用のAndroidアプリを作る
注意
このブログはチュウニズムというゲームに興味がない人が読んでもフーンとしか思えない内容となります。
一応アンドロイドアプリを作成したのですが、技術的に難しいことをしたわけではない(調べれば誰でもできる)ので、チュウニズムが好きな人か暇な人は読んでいってください。
そうじゃない人はブラウザバックで構いません。
まえがき
皆さんこんにちは、ウグイスです。
ブログで触れるのは久しぶりなのですが、私はチュウニズムというゲーセンに置いてある音ゲーが相当好きです。
どれくらい好きかといえば、10時間以上食事もとらずに遊べるくらい。
そんな私なのでアップデート情報は割としっかり確認しています。
今日(7/20)の昼に以下の情報が公開されました。
このサイトの下の方に全国対戦イベント ~ 焔の祝祭 『The Emperor of Blaze』開催! とあります。
【イベント概要】
・期間中、全国対戦の順位結果に応じて、1戦ごとにバトルポイント(以下BP)が加算されます。
※ゲーム中や、CHUNITHM-NETでは、現在のBPの確認はできません。
期間中、CHUNITHM公式Twitterで、中間発表などを行う予定です。
順位結果により加算されるBPは以下になります。
1位 10BP / 2位 8BP / 3位 6BP / 4位 4BP1位 10BP / 2位 8BP / 3位 6BP / 4位 4BP
で大事なところは、2行目のBPの確認ができないところです。
中間発表等はあるみたいですが、何位まで表示されるのかわかりませんし、最悪BPが途中からわからなくなりそうだなと
なので自分のBPを保存しておくアプリを作ろうってわけです。
一応チュウニズム知らない人向けに説明
全国対戦は各日12時以降から遊べる、別のゲーセンで遊んでいる人とランダムにマッチングして順位を競うモードです。人数は4人、最低開始人数は2人で足りない人数はCPUが埋めます。
作っていく
どういうものを作るか
まず大事なのは、機能の整理です。これくらい単純なら行き当たりばったりでもいいのですが、まとめておくといいことがあるので作る前に整理します。
- 1-4位までに対応するボタン、現在のBPを表示する部分、ミスった時に修正できるような部分がある
- 1-4位までに対応するボタンを押すと、現在のBPを表示する部分が変わる。
- 現在のBPをアプリを終了しても保持する機能
大体この3つがあれば、自分が使う用としては十分でしょう。
UIタイム
AndroidStudioを使って開発します。インストール方法とかは各自で調べてください
まずはUIを作ります。
activity_main.xmlを以下のようにします。
activity_main.xml
<?xml version="1.0" encoding="utf-8"?>
<androidx.constraintlayout.widget.ConstraintLayout xmlns:android="http://schemas.android.com/apk/res/android"
    xmlns:app="http://schemas.android.com/apk/res-auto"
    xmlns:tools="http://schemas.android.com/tools"
    android:layout_width="match_parent"
    android:layout_height="match_parent"
    tools:context=".MainActivity">

    <TextView
        android:id="@+id/bpView"
        android:layout_width="wrap_content"
        android:layout_height="wrap_content"
        android:layout_marginTop="60dp"
        android:textSize="96sp"
        app:layout_constraintEnd_toEndOf="parent"
        app:layout_constraintStart_toStartOf="parent"
        app:layout_constraintTop_toTopOf="parent" />

    <TextView
        android:id="@+id/textView2"
        android:layout_width="wrap_content"
        android:layout_height="wrap_content"
        android:layout_marginStart="50dp"
        android:layout_marginTop="40dp"
        android:text="@string/_1_10bp"
        android:textSize="34sp"
        app:layout_constraintStart_toStartOf="parent"
        app:layout_constraintTop_toBottomOf="@+id/bpView" />

    <TextView
        android:id="@+id/textView3"
        android:layout_width="wrap_content"
        android:layout_height="wrap_content"
        android:layout_marginStart="50dp"
        android:layout_marginTop="20dp"
        android:text="@string/_2_8bp"
        android:textSize="34sp"
        app:layout_constraintStart_toStartOf="parent"
        app:layout_constraintTop_toBottomOf="@+id/textView2" />

    <TextView
        android:id="@+id/textView4"
        android:layout_width="wrap_content"
        android:layout_height="wrap_content"
        android:layout_marginStart="50dp"
        android:layout_marginTop="20dp"
        android:text="@string/_3_6bp"
        android:textSize="34sp"
        app:layout_constraintStart_toStartOf="parent"
        app:layout_constraintTop_toBottomOf="@+id/textView3" />

    <TextView
        android:id="@+id/textView5"
        android:layout_width="wrap_content"
        android:layout_height="wrap_content"
        android:layout_marginStart="50dp"
        android:layout_marginTop="20dp"
        android:text="@string/_4_4bp"
        android:textSize="34sp"
        app:layout_constraintStart_toStartOf="parent"
        app:layout_constraintTop_toBottomOf="@+id/textView4" />

    <Button
        android:id="@+id/button1"
        android:layout_width="wrap_content"
        android:layout_height="wrap_content"
        android:layout_marginStart="30dp"
        android:layout_marginTop="40dp"
        android:text="@string/plus"
        android:textSize="20sp"
        app:layout_constraintStart_toEndOf="@+id/textView2"
        app:layout_constraintTop_toBottomOf="@+id/bpView" />

    <Button
        android:id="@+id/button2"
        android:layout_width="wrap_content"
        android:layout_height="wrap_content"
        android:layout_marginStart="30dp"
        android:layout_marginTop="20dp"
        android:text="@string/plus"
        android:textSize="20sp"
        app:layout_constraintStart_toEndOf="@+id/textView2"
        app:layout_constraintTop_toBottomOf="@+id/button1" />

    <Button
        android:id="@+id/button3"
        android:layout_width="wrap_content"
        android:layout_height="wrap_content"
        android:layout_marginStart="30dp"
        android:layout_marginTop="20dp"
        android:text="@string/plus"
        android:textSize="20sp"
        app:layout_constraintStart_toEndOf="@+id/textView2"
        app:layout_constraintTop_toBottomOf="@+id/button2" />

    <Button
        android:id="@+id/button4"
        android:layout_width="wrap_content"
        android:layout_height="wrap_content"
        android:layout_marginStart="30dp"
        android:layout_marginTop="20dp"
        android:text="@string/plus"
        android:textSize="20sp"
        app:layout_constraintStart_toEndOf="@+id/textView2"
        app:layout_constraintTop_toBottomOf="@+id/button3" />

    <Button
        android:id="@+id/setBpButton"
        android:layout_width="wrap_content"
        android:layout_height="wrap_content"
        android:layout_marginStart="40dp"
        android:layout_marginTop="48dp"
        android:text="@string/setbp"
        android:textSize="20sp"
        app:layout_constraintStart_toEndOf="@+id/textView2"
        app:layout_constraintTop_toBottomOf="@+id/textView5" />

    <EditText
        android:id="@+id/editTextNumber"
        android:layout_width="wrap_content"
        android:layout_height="wrap_content"
        android:layout_marginStart="40dp"
        android:layout_marginTop="50dp"
        android:ems="10"
        android:inputType="number"
        app:layout_constraintStart_toStartOf="parent"
        app:layout_constraintTop_toBottomOf="@+id/textView5" />
</androidx.constraintlayout.widget.ConstraintLayout>
単調…
一応補足しておきますと、AndroidStudioではxmlでUIを作ります。ただ、全部文字でコーディングしないといけないわけではなくて、GUIで編集できるような機能がついています。
なので、私は作成自体はGUIで行いました。
今回は、コピペができたほうがいいかなということでXMLで貼り付けました。
あとstring.xmlもないと表示できないですね。
string.xml
<resources>
    <string name="app_name">BPcounter</string>
    <string name="_1_10bp">1位(10BP)</string>
    <string name="_2_8bp">2位(8BP)</string>
    <string name="_3_6bp">3位(6BP)</string>
    <string name="_4_4bp">4位(4BP)</string>
    <string name="plus">+</string>
    <string name="setbp">SetBP</string>
</resources>
それぞれ既存のファイルの内容をこれに置き換えれば、以下のようなUIになると思います。
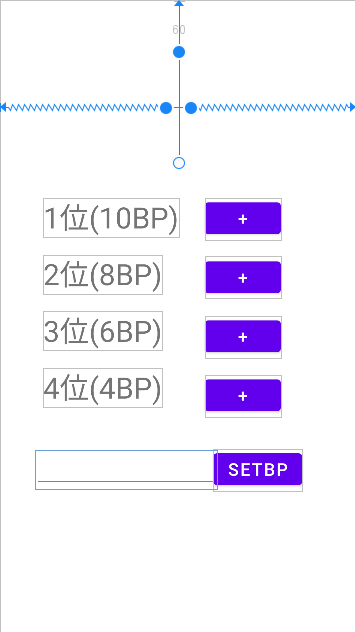
これでUI完成です。BP表示部分はソースコードからテキストを入力するのでテキストは入ってません。
ちなみに見ればわかると思いますが、真ん中4つが順位に対応しています。それぞれのボタンを押すとBPが増えます。
一番下は、ミスった時の修正機能で、テキストフィールドに入力した値が現在のBPになる機能のためのUIです。
プログラミングタイム
ではプログラミングをしていきましょう。ソースコードを貼って軽く解説程度でいいですかね。
先に断っておきます、使用言語はKotlinです。なんかコードブロックの右上が気になる。がそれは気のせい
MainActivity.kt
package com.example.bpcounter

import android.content.Context
import androidx.appcompat.app.AppCompatActivity
import android.os.Bundle
import android.widget.Button
import android.widget.EditText
import android.widget.TextView

class MainActivity : AppCompatActivity() {
    override fun onCreate(savedInstanceState: Bundle?) {
        super.onCreate(savedInstanceState)
        setContentView(R.layout.activity_main)

        val sharedPref = getPreferences(Context.MODE_PRIVATE)
        var bp = sharedPref.getInt("bp", 0)
        setBP(bp)

        findViewById<Button>(R.id.button1).setOnClickListener {
            bp += 10
            setBP(bp)
        }
        findViewById<Button>(R.id.button2).setOnClickListener {
            bp += 8
            setBP(bp)
        }
        findViewById<Button>(R.id.button3).setOnClickListener {
            bp += 6
            setBP(bp)
        }
        findViewById<Button>(R.id.button4).setOnClickListener {
            bp += 4
            setBP(bp)
        }
        findViewById<Button>(R.id.setBpButton).setOnClickListener {
            with(findViewById<EditText>(R.id.editTextNumber).text) {
                bp = toString().toIntOrNull() ?: bp
                clear()
            }
            setBP(bp)
        }
    }

    private fun setBP(bp: Int) {
        val sharedPref = getPreferences(Context.MODE_PRIVATE)
        with(sharedPref.edit()) {
            putInt("bp",bp)
            apply()
        }
        findViewById<TextView>(R.id.bpView).text = "${bp}BP"
    }
}
setBP関数
関数setBPが保存機能と表示機能に相当します。(ただ終了時だけではなくBPが変化するたびに保存する仕組み)
引数でbpを渡されたらそれを保存してGUIに表示する関数です
val sharedPref = getPreferences(Context.MODE_PRIVATE)
で共有環境設定ファイルというものを読み込んでいます。簡単に言えばアプリに単純なデータ(IntとかStringとかFloatとか)を保存する際に使える機能です。
withブロック内で共有環境設定ファイルにデータを入力しています。
Key-Value方式でKeyに対してValueが一つ対応する仕組みです。この場合は”bp”がKey、bpがValueになります。
onCreate関数
15行目から17行目で、保存していたデータを読み込んでいます。
あとは全部、ボタンがクリックされたらどういう動きをするのかを記述する部分です。
基本的にはBPを増やして、setBP関数を呼んでいる感じです。
最後だけは、テキストフィールドから値を読み込んで、BPの値を上書きしてからsetBP関数を読んでいます。ミスった時に直接BPを変更するための機能です。
これで完成です。
実機でテスト
スマホをパソコンに繋いでUSBデバッグをオンにすると、アプリを入れれます。
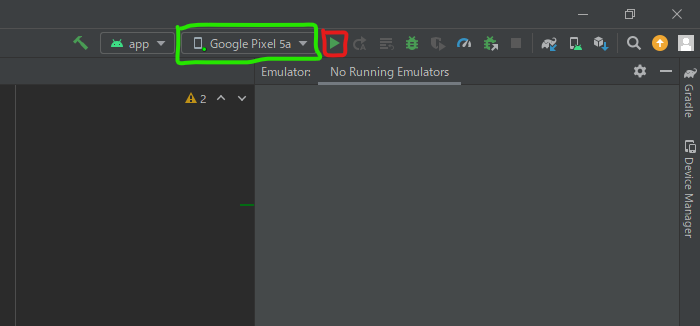
AndroidStudioの右上部分です、緑の枠線で実機を選び、赤枠の実行ボタンを押すとスマホにインストールされて起動します。(私のスマホは画像の通りPixel5aです)
スクショしてみた
初期画面(ミスって音量バーが表示されているが気にしないで)
![]()
1位のボタンをクリック
![]()
数値を入力
![]()
入力した値に変化したのを確認
![]()
あとがき
これで、自分のBPを管理できますね。ランキング上位じゃなくても、どの程度なのかを確認できるのでちょっと便利じゃないかなと思います。
あと、これは今日書かないと意味ないかなと思ったので、雑なブログですがYURUSHITE。
最近、android以外でもkotlinでプログラムを書きまくってますね。
サーバー(ktor)、コマンドラインアプリ、デスクトップアプリなど、ビルドした実行ファイルを送るだけで、JAVAの環境があれば動かせるのが強み。(JVM上で動作する言語なので)
あと個人的な感想ですが書きやすいと思います。
コメント入力